Learn how to handle and care for the BECOS products you bought so that you can enjoy them for years to come. Every material has its own unique characteristics, so we have care instructions and advice for each of them. Through proper handling and care, you will get to experience the joy of having your products slowly adapt to you and your way of living.

The Difference Between Earthenware and Porcelain

In Japanese, wares made by shaping and firing soil or stone are called “tojiki” or in English, “ceramics.” It is a general term that includes “toki” earthenware and “jiki” porcelain.

 As a quick example, Japanese teapots and cups are usually earthenware, while elegant coffee cups are normally made from porcelain.

Earthenware can be defined as “items made by glazing and firing shaped clay.” The resulting wares tend to be somewhat porous, soft, and opaque.This type of ceramic is made from soil (“tsuchi” in Japanese) and is therefore sometimes referred to as “tsuchimono.”

Porcelain is fired at higher temperatures than earthenware until it achieves the hard consistency of glass and becomes translucent, allowing some light to pass through it. The resulting material is completely impermeable to liquids.Porcelain is primarily made from clay mixed with ground rock (“ishi” in Japanese) and is therefore sometimes referred to as “ishimono.” In East Asian terminology, the term “stoneware” is not recognized and products that would fall under that category in the West are considered porcelain in Japan.

Earthenware

Characteristics

Earthenware is made from a special kind of soil called “potter’s clay” which is glazed and fired at a relatively low temperature. Each piece is unique, owing to natural changes in shape, color, and texture that occur while it’s fired inside a kiln.This type of ceramic is porous and therefore absorbs some water, resulting in the wares eventually changing color due to “crazing” (cracks in the glaze). This change in the wares’ appearance over time is one of the big draws of earthenware.*Glaze: A vitreous chemical used to coat the surface of ceramics before firing to make them more waterproof and give them their distinctive shine. 

Since earthenware absorbs liquids, it is recommended to go through the process of “medome” (filling), which involves treating a brand-new ware’s surface with starch before using it for the first time. This will prevent water and oil from seeping into the earthenware and protect it against discoloration, staining, or acquiring any unpleasant odors. *Medome may not be necessary depending on the type of glaze used. Please check the care guide that came with your product for more details.

How to Do “Medome”

What you’ll need: a pot to soak the item in, waste water from washing rice (or water with flour or potato starch), cooked rice (1 – 2 spoonfuls)

1Fill the pot with enough rice waste water to cover the item, then place the item and cooked rice in the pot.

2Place the pot on low to medium heat and slowly increase the temperature. Turn the heat down to low shortly before boiling. Simmer for 15 to 20 minutes. Be sure to increase the temperature gradually, as doing it too fast may result in cracking or breaking.

3Turn the heat off and let the pot cool with the item inside. Once the water has cooled down, wash the sticky liquid off the item, dry it with a cloth, and leave it out to air dry. (If you have time, it is best to leave the item soaking for about half a day.)

If your kitchen is not equipped for medome, simply try soaking the item in water for 12 to 24 hours and then dry it off before using it for the first time.

If you are serving hot food, rinse your earthenware with warm water before plating. If you’re serving cold food, rinse it with cold water. This will protect your wares from smells and stains and will enhance the meal by keeping hot food warm and cold food cold.

Wash your earthenware with a soft sponge using a neutral dishwashing liquid and rinse thoroughly. Since earthenware absorbs water, soaking it for a long time or failing to dry it off thoroughly can result in mold or unpleasant odors. It is best to store it in a well-ventilated place.

Unless specifically treated to be heat resistant, earthenware is prone to thermal shock and, as a result, cannot be used in microwaves or ovens.

Micro waveOvenOpen flameIHDish washer
××××

Porcelain

Characteristics

Porcelain is made by grinding up white porcelain stone, kneading it until it becomes clay, and then firing the shaped items at a high temperature. Porcelain stone has a high feldspar and silica content. When fired at a high temperature, the feldspar and silica vitrify (convert into glass), creating a product that’s thin but durable with a smooth surface. And because porcelain is impermeable, you can use it as much as you like without worrying about staining or the wares acquiring unpleasant odors.

Wash your porcelain with a soft sponge using a neutral dishwashing liquid and rinse lightly before using it for the first time.

If you are serving hot food, rinse your porcelain with warm water before plating. If you’re serving cold food, rinse it with cold water. This will protect your wares from smells and stains and will enhance the meal by keeping hot food warm and cold food cold.

Wash your porcelain with a soft sponge using a neutral dishwashing liquid and rinse thoroughly to prevent mold. It is best to store it in a dry place.

Porcelain is generally microwave safe. However, porcelain with glaze that includes metal—such as gold, silver or platinum—cannot be microwaved, as the glaze may peel off or catch fire.

Micro waveOvenOpen flameIHDish washer
×××
  • Stains should be dealt with as soon as they are noticed since they can be difficult to remove once they penetrate the surface. Acidic stains, such as from oils and tea, can be removed by sprinkling baking soda on them, leaving it for about ten minutes, then rubbing the stained areas with a cloth. However, please note that baking soda powder is an abrasive agent, so be gentle when using it to clean your porcelain.
  • Hard water stains and odors: Soak in water with lemon juice and bring to a boil 2 or 3 times. Citric acid can be used instead of lemon juice. If the odor persists, soak in water with baking soda for about half a day, then rinse thoroughly to remove the baking soda residue and dry off.
  • Mold: Wash the mold off as you would during a normal cleaning. If you wish to thoroughly remove mold from grooves and other hard-to-reach places, disinfect the item by boiling it in hot water for about 10 minutes. The results can be improved by adding 2 – 3 tablespoons of vinegar to the water to sterilize it before boiling.
  • Chips: If you want to easily fix small chips, you can do so using putty glue. If your item is used to serve food or drinks, be sure to choose a putty that is certified as food safe. If you want to thoroughly fix your item, it is possible to repair the cracked or chipped parts through a process called “kintsugi” which involves covering the mends and seams with gold or silver. If you’d like a professional to fix your product, consult the manufacturer you purchased the porcelain from.

Glassware

Characteristics

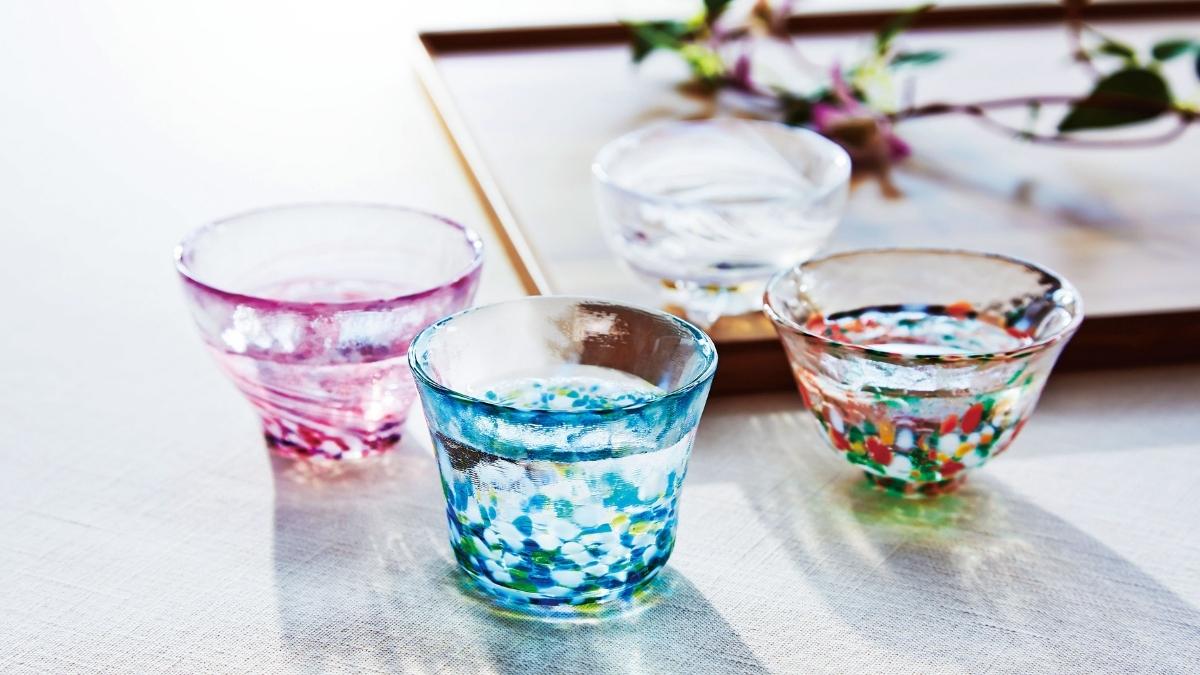
Glassware is distinguished by the way that it sparkles in the light and the delicate colors and designs it can be decorated with. It can bring a sense of festivity to everyday dishes and liven up your dining table. There is a wide variety of glass available, such as soda-lime glass, crystal glass, and heat-resistant glass, with varying levels of transparency, durability, and heat resistance.

Wash your glassware with a soft sponge using a neutral dishwashing liquid and rinse lightly before using it for the first time.

Wash your glassware with a soft sponge using a neutral dishwashing liquid and rinse thoroughly. To avoid water stains, dry it off with a cloth rather than letting it air dry. Use dish cloths made from non-woven fabric or linen to avoid leaving any lint on the glass.

Glass, other than the heat-resistant variety, is generally not safe to put in microwaves, ovens, or dishwashers. Special care should be taken with glassware to protect its delicate decorations and handles, as they can be damaged easily.

Micro waveOvenOpen flameIHDish washer
×××××
  • Clouding: This problem is usually caused by calcium in tap water or oil from food and drinks. Calcium is alkaline, so to remove it, gently wipe the glass with a cloth soaked in a tablespoon of vinegar, which is acidic. Then rinse with hot water and dry thoroughly. Since oil is acidic, the best way to treat it is with baking soda, which is alkaline. Dampen the glassware and sprinkle a pinch of baking soda over it and polish with crumpled up plastic wrap (a sponge is not as effective, as it will end up soaking up the baking soda). Finally, rinse with hot water and dry thoroughly. Avoid using vinegar or baking soda on crystal glass.
  • Coffee and tea stains: First, check for parts such as metal or handles made from resin or wood that bleach cannot be applied to, and if it is safe, soak the glassware in diluted bleach for about 30 minutes and rinse thoroughly.
  • Cracks and chips: Check with the manufacturer, as some will fix chips by shaving or cutting them off.

Lacquerware

Characteristics

Lacquerware refers to items covered in multiple layers of lacquer, the milky white sap that is produced when a lacquer tree is cut. Lacquerware is extremely durable, water-resistant, heat-resistant, antiseptic, and antibacterial. Lacquerware does not like to be dry, and when gently washed and dried with a cloth after daily use, it will gradually become more lustrous over the years. The joy of witnessing its transformation is one of the big draws of lacquerware.

Newly finished lacquerware sometimes retains the smell of lacquer. If it bothers you, take it out of the box and leave it out to dry in a shaded and well-ventilated place for 2 – 4 weeks and the odor should go away on its own. If you are in a hurry, you can also leave it in a Japanese rice box for a few days or wipe it with the waste water from cooking rice with a bit of vinegar added to it.

Lacquerware can be washed with a soft sponge and neutral dishwashing liquid. Use lukewarm water to improve the lacquer’s luster, unless you’re dealing with oil. Do not soak lacquerware for prolonged periods of time, as it may cause warping or cracking. After washing, dry lacquerware with a soft cloth to prevent build-up of a white calcium residue from the tap water. Store in a well-ventilated, shaded place.

Lacquerware is prone to thermal shock and should not be put in microwaves or dishwashers. Also avoid storing it in a refrigerator, as it can cause cracking or warping.

Micro waveOvenOpen flameIHDish washer
×××××
  • Stubborn stains: Soak in hot or cold water for 5 – 10 minutes, then wash with a soft sponge and a neutral dishwashing liquid. Do not soak for prolonged periods of time, as it may cause peeling or warping.
  • Discoloration due to heat: If the lacquer has melted and turned a milky white color, it must be reapplied. The surface may also become dull if left under direct sunlight or artificial lighting for prolonged periods of time.
  • Mold: To remove white mold, soak a soft cloth in some rubbing alcohol and gently wipe the mold off. Black or blue mold may be difficult to remove as it means the fungus has penetrated deep into the item, so contact the manufacturer for advice.
  • Scratches and peeling: Have the lacquer reapplied before the problem worsens.
  • Chips and cracks: Chips and cracks can be mended with lacquer. Contact the manufacturer or a repair shop for advice.

Tinware

Characteristics

Among the various metals, tin has the unique characteristic of being so soft that it can be bent by hand. It also enchants people with its delicate, unassuming shine, which will last for years because the metal is resistant to oxidation. Tin additionally boasts superior thermal conductivity and the ability to soften the texture of drinks, thereby enhancing the flavors of cold sake, beer, or water,

Wash your tinware with a soft sponge using a neutral dishwashing liquid and rinse lightly before using it for the first time.

Wash your tinware with a soft sponge and a neutral dishwashing liquid, then dry it with a soft cloth to prevent water stains before storing. Avoid using scrub brushes or abrasive cleaners as they may damage the metal. Tin has a low melting point, so be careful not to place it near heat sources such as a stovetop. Tinware may also deteriorate in too low temperatures, so avoid placing it in freezers or storing it in refrigerators for prolonged periods of time.

Micro waveOvenOpen flameIHDish washer
×××××
  • Staining and dulling: Squeeze some toothpaste onto your finger or a gauze cloth and polish the affected area. Once you’re done, rinse the toothpaste off with lukewarm water, wash it with a neutral dishwashing liquid, and then dry it off. To avoid staining from dark liquids, do not leave dark-colored drinks inside tinware for prolonged periods of time and make a habit of washing them out as quickly as possible after each use.

Wooden Wares

Characteristics

Wooden wares have the warm appearance and texture unique to wood, and can thus bring a sense of tranquility to one’s daily life. They are also practical, as they’re lightweight and durable and have low thermal conductivity, making them ideal for holding hot liquids. Differences in the treatment of the wood, such as whether oil, beeswax, polyurethane, or a glass coating was used, determines how wooden wares should be handled.

When wood is coated with polyurethane, which is a resin, there can be an odor. Leave the item out in a well-ventilated, shaded place for about two weeks and the odor should go away on its own. If it’s a container, you can also get rid of the smell by repeatedly filling the ware with lukewarm water and pouring it out once it cools down.

Avoid soaking wooden wares in water for prolonged periods of time as it can cause mold, warping, and cracking. Finished wood can be washed with a soft sponge and a neutral dishwashing liquid. Dishwashing liquid can seep into untreated wood, so avoid using soap on those kinds of wares unless absolutely necessary, such as after putting raw or oily food inside or on them. After washing, both treated and untreated wooden wares should be wiped off with a soft cloth, kept away from direct sunlight, and stored in a well-ventilated place.

Wooden wares are easily affected by extreme changes in temperature. Avoid putting them in microwaves or storing them for long periods of time in refrigerators, as it may cause cracking or peeling.

Micro waveOvenOpen flameIHDish washer
×××××
  • Roughness and scratches: Soak a cloth in a small amount of vegetable oil, such as perilla oil, and gently rub it into the affected areas.

Leather Products

Characteristics

Leather products become softer and more lustrous over time, deepening their owners’ affection for them. One of their main appeals is that they respond visibly to care. They have durability and breathability, making them last a lifetime.

Water is the enemy of leather. If you want to keep your leather goods as pristine as possible, or if you have one with a light color that shows stains easily, give it regular treatments with a waterproofing product (like a spray). If you want to enjoy the changes in the leather that come with time, use only the minimum waterproofing treatment necessary to protect the leather from damage based on weather conditions.

After using your leather product, wipe or brush off the dirt from it with a cloth or leather-cleaning brush, and store it in a well-ventilated place. Leather will form itself depending on how it is being used, so it’s important to take care when storing leather products so that there are no fold lines or kinks. Be careful with handles and shoulder bags, as they are prone to creasing. If you are storing a bag for a long period of time, stuff it with towels or newspaper to absorb moisture and maintain the product’s shape. For extra protection, also wrap the bag in cloth.

Leather can crack when it becomes dry, so treat it with oil on a regular basis. With bags, give them an oil treatment once every other month. Small items that are handled frequently are moisturized by use, so only treat them when they start to feel dry, about once every season.

What you’ll need:

  • Leather-cleaning brush
  • Leather oil or cream
  • Soft cloth or sponge to rub the oil in
  • A cloth for buffing

Steps

1Gently brush the dust and finger marks off the surface of the leather using a brush. If it is badly soiled, use a damp towel that has been thoroughly wringed out to soften and wipe off the dirt.

2Dab a little oil (or cream) onto a clean and soft cloth or sponge and apply a little at a time. Too much oil (or cream) can cause staining, so be vigilant as you apply it. The appropriate amount is when the surface feels slightly moist after application. If it feels sticky, you may have applied too much, so wipe off the excess oil with a cloth. Be sure to also rub the oil into any metal, such as the teeth and pulls of zippers, to prevent rusting and to keep them working smoothly.

3Once you have rubbed oil (cream) onto the entire surface, let it seep in for a while. Finally, buff your leather product with a soft, clean, and dry cloth.

  • Spew: Spew is the white powder-like substance that forms when oils from within the leather crystalize on the surface upon contact with air. If spew forms on your leather product, simply wipe it off and apply leather oil or cream to the affected area.
  • Mold: If it’s a small amount of mold, wipe it off with a wringed out wet cloth and follow with a dry cloth. If it’s stubborn, remove it by gently dabbing it with a cloth lightly soaked in ethanol. This carries the risk of color loss or discoloration, so test it on an inconspicuous spot first. In either case, after wiping off the mold, apply some protective leather cream, buff everything with a soft, dry cloth, and let the product dry out in a shaded spot. If you are unsure about cleaning the mold yourself, take it to a leather repair shop.
  • Water marks: If you get water marks from rain or other liquids, even things out with a lightly wrung out wet towel. Next, wipe off any excess water with a separate, dry cloth. In the case of bags or shoes, stuff them with newspaper or towels and dry them slowly in a well-ventilated spot away from direct sunlight. Finally, before the product dries completely, treat it with a little bit of oil.
  • Rusting of metal parts: If you have blue rust, dab a little leather cleaner onto a cloth and wipe the rust off. If the rust is in a hard-to-reach spot, try using a cotton swab. Finish off by polishing the affected part with a metal polisher or a cloth or cotton swab dipped in vinegar.